Did you know that transferring pattern markings can be done without a tracing wheel and carbon paper? This method works perfectly for transferring notches, straight darts, pocket lines, marks for animal eyes and other elements, marks for appliques, etc.
Here is what you need:
- Fabric
- Pattern
- Cutting mat
- Straight pins
- Marking utensil
NOTE: Use erasable marking utensils for marking on right side of the fabric, and always test them prior to using. In this tutorial I used Pilot Frixion Clicker heat erasable marking pen.
To protect your working surface from scratches, lay out the fabric on a cutting mat. Position the pattern on the fabric as you would normally do, place a few pins to secure the pattern, and trace around the outline of the pattern using your marking utensil. Now, mark the important points (notches, marks, darts) as follows:
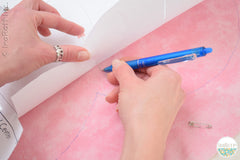
- Insert a pin through the mark (or corner) on the pattern into the fabric, making sure that the pattern edges are aligned with the previously traced lines.
- Lift up the edge of the pattern carefully and mark a dot at the needle point using your marking pen or pencil.
- Add all the remaining marks in the same manner.
- Remove the pins and the pattern from the fabric.

If you need to transfer darts or other shapes with straight edges, just mark each corner, then remove the pattern and connect these points using a straight edge ruler. Please note that this method may not work for transferring curved lines.