
Finishing a quilt without binding is easier than it looks. In my previous tutorial, Finishing Irregular Quilt Edges Without Binding, I used two pieces of batting - one for the front and one for the back. This method is a little different: it creates a clean, bindless finish using only one piece of batting.
For this project, I repurposed denim scraps for the quilt top and used a lightweight polyester sleeping bag instead of traditional batting. The backing fabric came from my mom’s vintage stash. It’s amazing how much you can find around the house to keep material costs low. Here are a few tools and materials I love for projects like this:
Tools & Materials
- Aurifil Thread – Arctic Sky (2612) - A beautiful neutral that blends well with denim. I used it for both piecing and quilting without changing colors.
- Clover Point 2 Point Turner - Perfect for turning crisp corners and smoothing edges.
- Fiskars 5″ Easy Action Fabric Snips - Ideal for clipping corners and trimming bulk in tight spaces.


How to Finish a Quilt Without Binding
1. Prepare the Front
- Lay your finished quilt top right side up on a single piece of batting (I used an old sleeping bag).
- Pin or spray baste to secure the layers.
- Stitch in the ditch around the main intersections to stabilize the top. In the photos, the green side shows the quilting on the back of the sleeping bag.
- Keep the basting pins in place (you’ll need them later).
- Straight‑stitch around the outer edge, about ⅛″ from the edge, to define the shape.
- Trim away the excess batting.


2. Attach the Backing
- Place the quilted front right sides together with the backing fabric.
- Pin around the edges.
- Sew around the entire shape with a ¼″ seam allowance, leaving a 6″–8″ opening along the bottom edge for turning.
- Trim away excess backing.
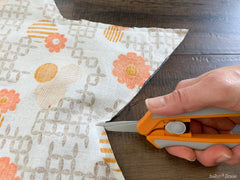
- Clip concave corners and trim bulk from convex corners, carefully avoiding the stitching.


3. Turn, Press & Quilt
- Turn the quilt right side out through the opening. Use a point turner to gently push out corners.
- Press the edges flat.
- Pin the layers together using some of the original basting pins; this secures the front, batting, and back.
- Topstitch around the entire quilt, closing the opening as you sew.
- Add additional quilting through all three layers, and your bindless quilt is complete.


This tutorial features Tops The Triceratops Jelly Roll Rug as the example project.


